> ## Documentation Index
> Fetch the complete documentation index at: https://controlplanecorporation-kyle-cron-and-quotas.mintlify.site/llms.txt
> Use this file to discover all available pages before exploring further.
# Configure a CDN
> Set up a Content Delivery Network (CDN) such as Cloudflare or Amazon CloudFront to protect and accelerate your workloads on Control Plane.
A Content Delivery Network (CDN) such as [Cloudflare](https://cloudflare.com) can protect and accelerate your [workload](/reference/workload) running on Control Plane.
The configuration of various CDN providers is similar in concept. In this guide, you will find the steps on how to configure a CDN with [Cloudflare](#cloudflare-configuration-steps) and [Amazon CloudFront](#amazon-cloudfront-configuration-steps).
Configure your domain’s CNAME to target either a `GVC endpoint` or a `Workload endpoint`.
A [GVC](/reference/gvc) endpoint routes traffic across all domains mapped to the same GVC and is useful when a single CDN route is configured for many domains or wildcard subdomains. Geo-routing still applies, but traffic will be sent to all locations even if a specific workload in one location is unavailable.
A workload endpoint routes traffic to a specific workload within a GVC and provides more precise geo-routing and failover for that workload.
If a workload in one location is down, traffic will fail over to other locations for just that workload.
## Cloudflare Configuration Steps
### Prerequisites
* Review the [Configure a Domain](/guides/configure-domain) guide.
* An account at Cloudflare.
* Your domain's DNS is hosted at Cloudflare.
* Your workload is configured and in a `Ready` state.
### Step One - Domain Set Up and Certificate Generation at Cloudflare
**From the Cloudflare UI, perform the following:**
#### Domain Set Up
* From the DNS management page for your domain, click `DNS Records` in the top right and add a new `CNAME` record.
* For the `Name` field, enter the desired target subdomain.
* For the `Target` field, enter the `Canonical Endpoint` URL from the [workload](/reference/workload) Info page.
* Toggle on the `Proxied` switch.
#### Certificate Generation Set Up
* From the SSL/TLS page, select the `Full (strict)` radio box.
* Click on the `Origin Server` submenu link.
* Create a new origin certificate for your domain with the following settings. This certificate will be added as a [TLS Secret](/reference/secret#tls) at Control Plane.
* Select `Generate private key and CSR with Cloudflare`.
* Select the private key type: `RSA (2048)`.
* The default list of hostnames shouldn't have to be changed and will contain the `*.DOMAIN` and `DOMAIN` hostnames.
* Choose a long Certificate Validity such as 15 years.
* **NOTE: It is your responsibility to ensure the certificate mapped to your domain at Control Plane is valid.**
* Click `Create`. The next page will display the certificate and private key. You may save these as separate text files or leave the page open and copy/paste the values when creating the [TLS Secret](/reference/secret#tls) at Control Plane in [Step Two](#step-two---certificate-set-up-at-control-plane).
### Step Two - Certificate Set Up at Control Plane
* Using the certificate and private key generated in [Step One - Certificate Generation Set Up](#certificate-generation-set-up), create a new [TLS Secret](/reference/secret#tls) at Control Plane by performing the following:
* Click `Secrets` from the left side menu.
* Click the `New` button at the top.
* Enter a `Name` for the secret and select the secret type `TLS`.
* Click `Data` in the left pane. Either upload or paste the respective certificate and private key file in the proper textbox. The TLS Chain can be left empty since this certificate is self-signed.
* Click `Create`. This secret will be used when configuring your domain in the next step.
### Step Three - Domain Set Up at Control Plane
Follow the steps below to configure your domain at Control Plane.
**Note: If a subdomain is being configured, the APEX domain will need to be [verified](/guides/configure-domain#step-one-apex-domain-verification).**
1. Click `Domains` from the left side menu.
2. Click the `New` button at the top.
3. Click `Advanced` in the left pane. Enter the `Fully Qualified Domain Name (FQDN)` of your domain. You will need to prove ownership of the domain before continuing.
4. Select `CNAME` for the `DNS Mode`.
5. Select and configure the desired `Routing Mode`.
6. Click the `Add +` tab, and toggle `Use Custom Server Certificate`. Set the `Server Certificate Authority PEM` to the [TLS Secret](/reference/secret#tls) created in the previous step, then click `Create`.
After completing Steps One through Three, it will take a few minutes for the updates to propagate throughout the Internet.
Once fully configured, your workload will be accessible via the CDN using the subdomain configured in [Step One - Domain Set Up](#domain-set-up).
## Amazon CloudFront Configuration Steps
### Prerequisites
* An AWS account.
* Access to edit DNS settings for your domain.
* Your workload is configured and in a `Ready` state.
### Step One - Request a public certificate
Request a public certificate with [AWS Certificate Manager (ACM)](https://us-east-1.console.aws.amazon.com/acm/home?region=us-east-1#/certificates/request) in `N. Virginia` region using the settings below.
1. A public TLS certificate is required for your domain. Use the following settings:
* Domain Names: `subdomain.mydomain.com` or `*.mydomain.com`
* Validation Method: `DNS Validation`
* Key Algorithm: `RSA 2048`
The certificate must be in the US East (N. Virginia) Region (us-east-1).
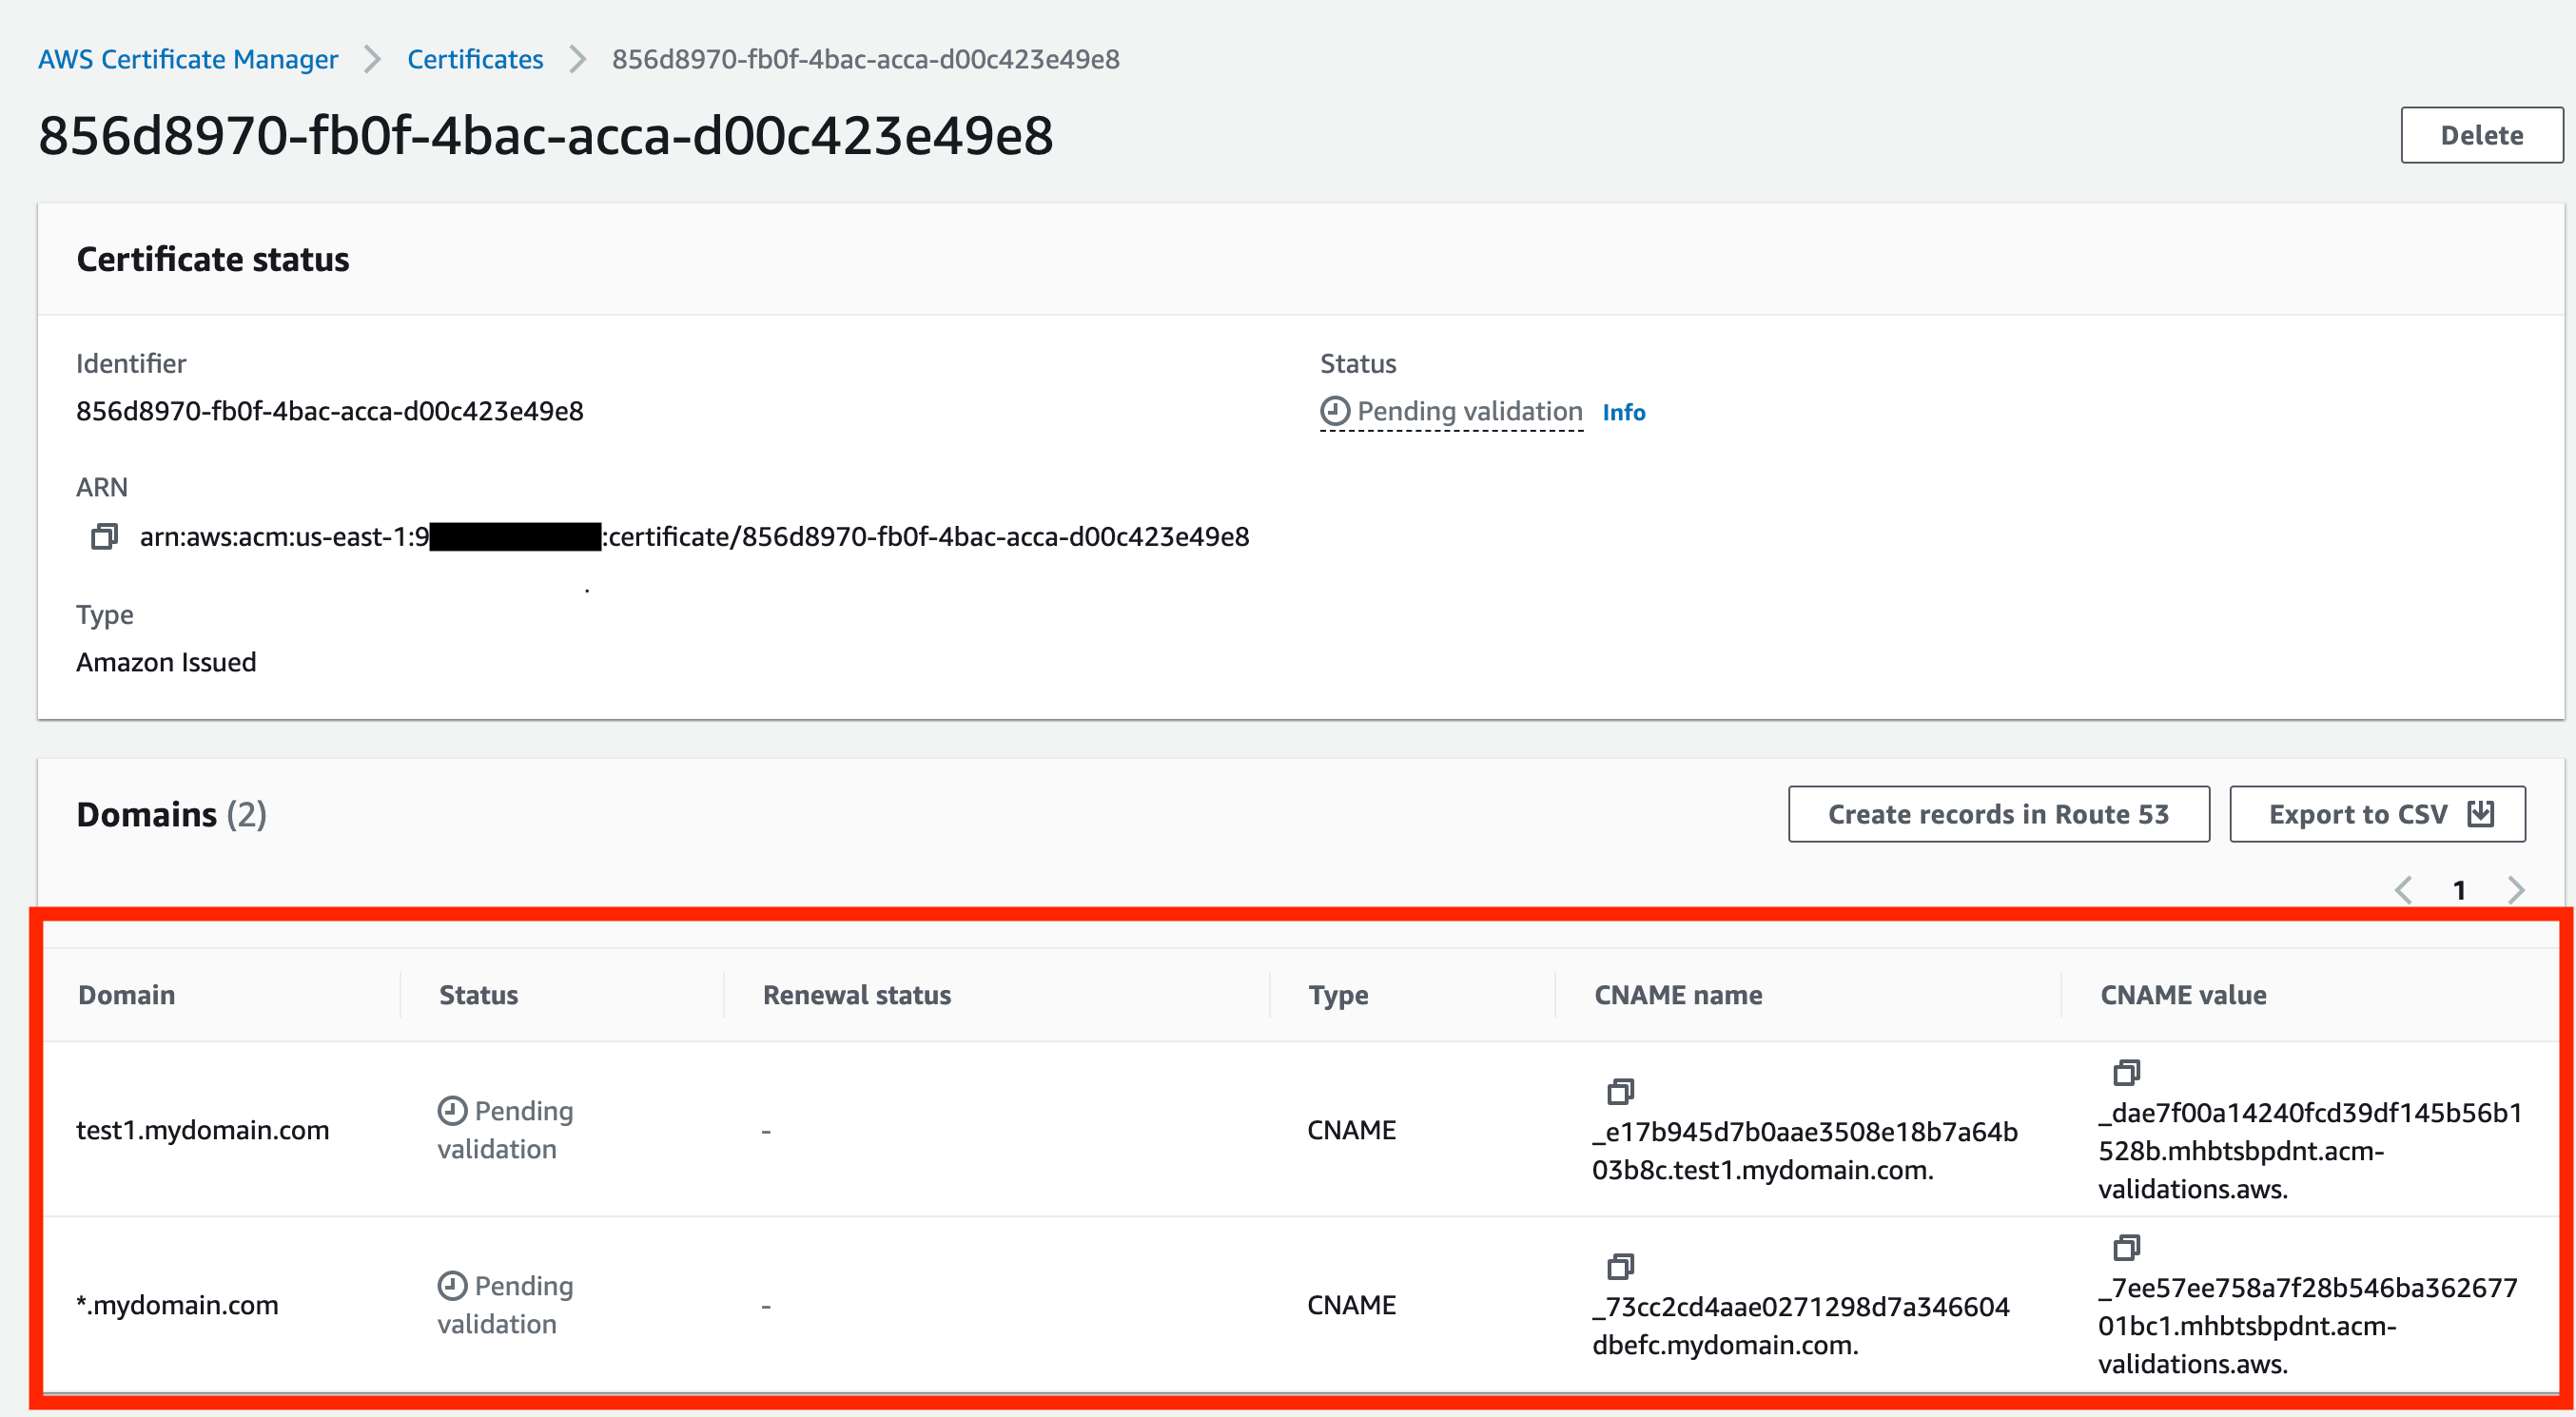
2. Access the newly created certificate on the [ACM](https://us-east-1.console.aws.amazon.com/acm/home?region=us-east-1#/certificates/list). Validate the certificate by creating the records in your DNS service as described.
 ### Step Two - Create CloudFront distribution
1. Go to [CloudFront distributions page](https://us-east-1.console.aws.amazon.com/cloudfront/v4/home#/distributions) and click on `Create Distribution`.
2. Configure the `Origin Domain` to the public endpoint of your workload. Use one of the following methods, depending on whether you are using a [**BYOK location**](/byok/overview) or a **managed location (standard)**:
* For **managed locations (standard)** only:
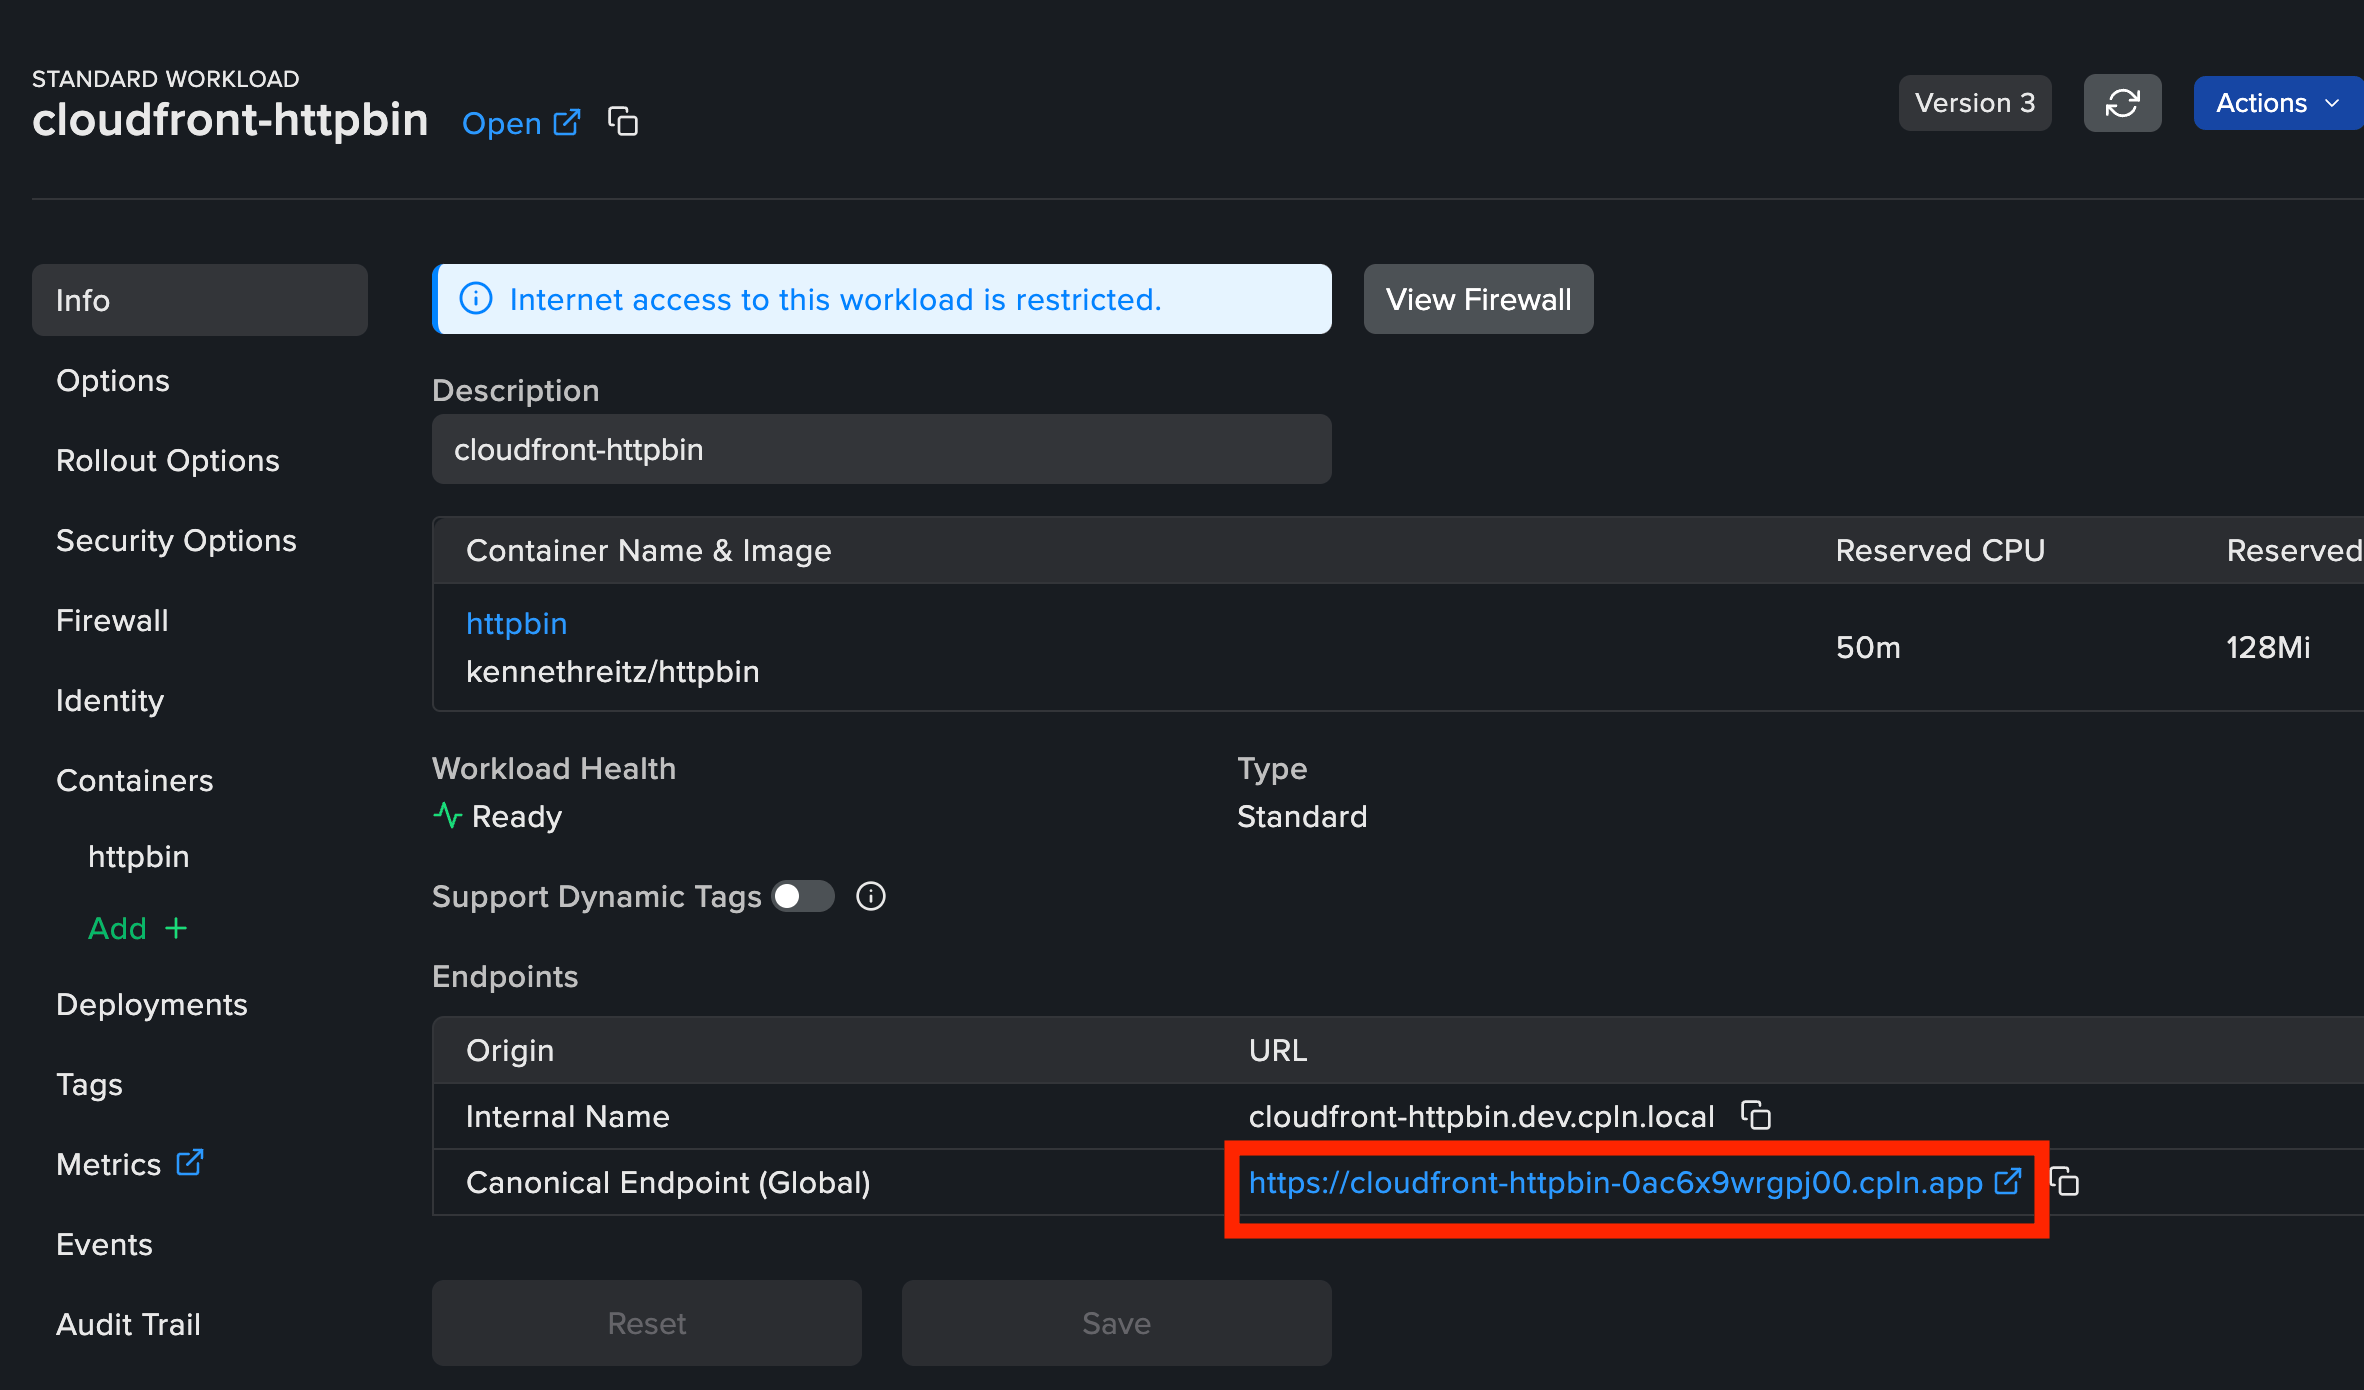
Use the `Canonical Endpoint` URL from the [Workload Info page](/reference/workload) as `Origin Domain`, formatted as follows: `cloudfront-httpbin-0ac6x9wrgpj00.cpln.app`.
### Step Two - Create CloudFront distribution
1. Go to [CloudFront distributions page](https://us-east-1.console.aws.amazon.com/cloudfront/v4/home#/distributions) and click on `Create Distribution`.
2. Configure the `Origin Domain` to the public endpoint of your workload. Use one of the following methods, depending on whether you are using a [**BYOK location**](/byok/overview) or a **managed location (standard)**:
* For **managed locations (standard)** only:
Use the `Canonical Endpoint` URL from the [Workload Info page](/reference/workload) as `Origin Domain`, formatted as follows: `cloudfront-httpbin-0ac6x9wrgpj00.cpln.app`.
 * For [BYOK locations](/byok/overview) only:
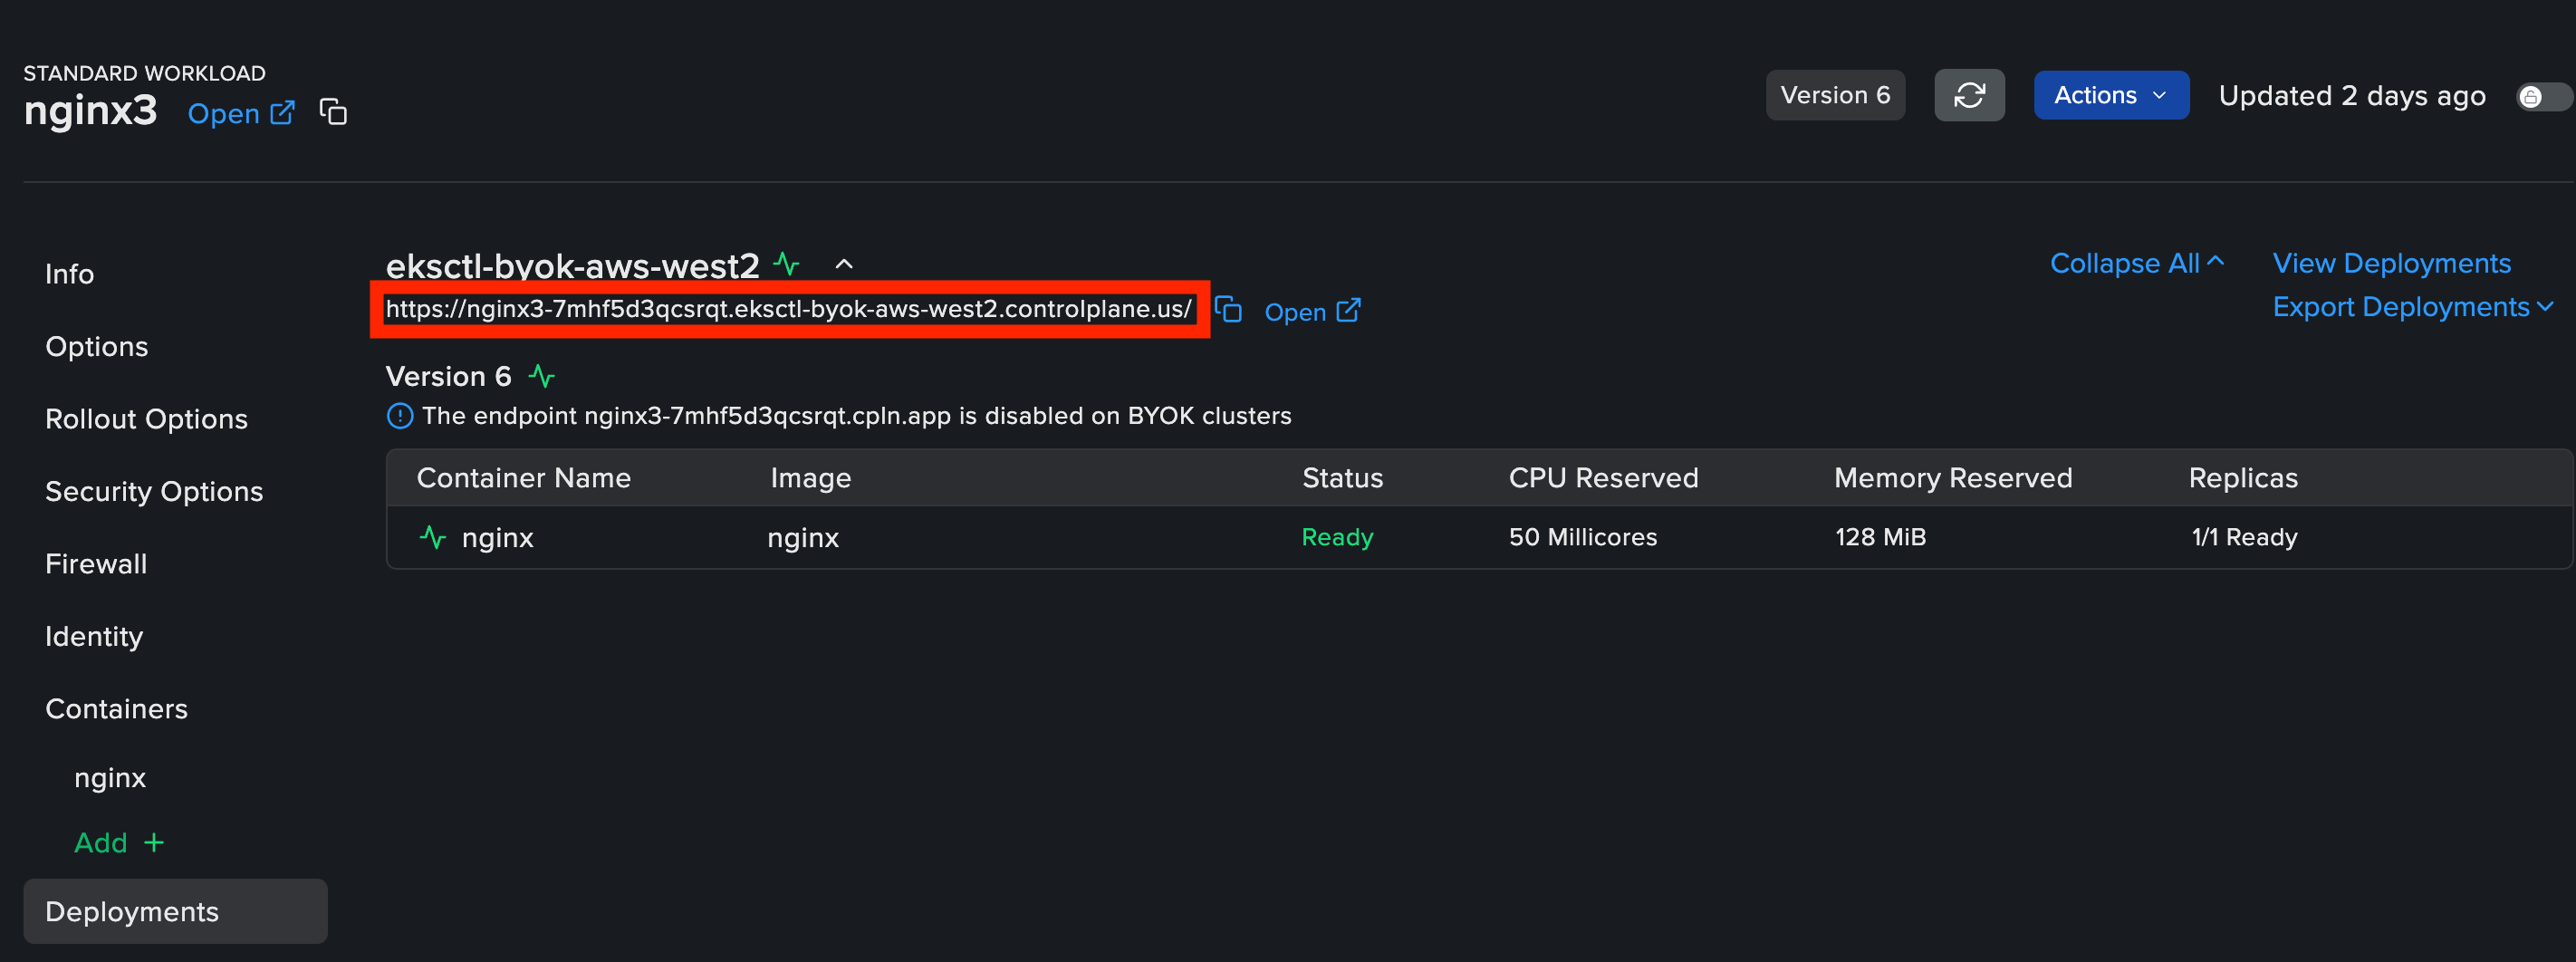
Locate the public endpoint on your Workload *Deployments* page. Use this address as the `Origin Domain` value in CloudFront, formatted as follows: `nginx3-7mhf5d3qcsrqt.eksctl-byok-aws-west2.controlplane.us`.
* For [BYOK locations](/byok/overview) only:
Locate the public endpoint on your Workload *Deployments* page. Use this address as the `Origin Domain` value in CloudFront, formatted as follows: `nginx3-7mhf5d3qcsrqt.eksctl-byok-aws-west2.controlplane.us`.
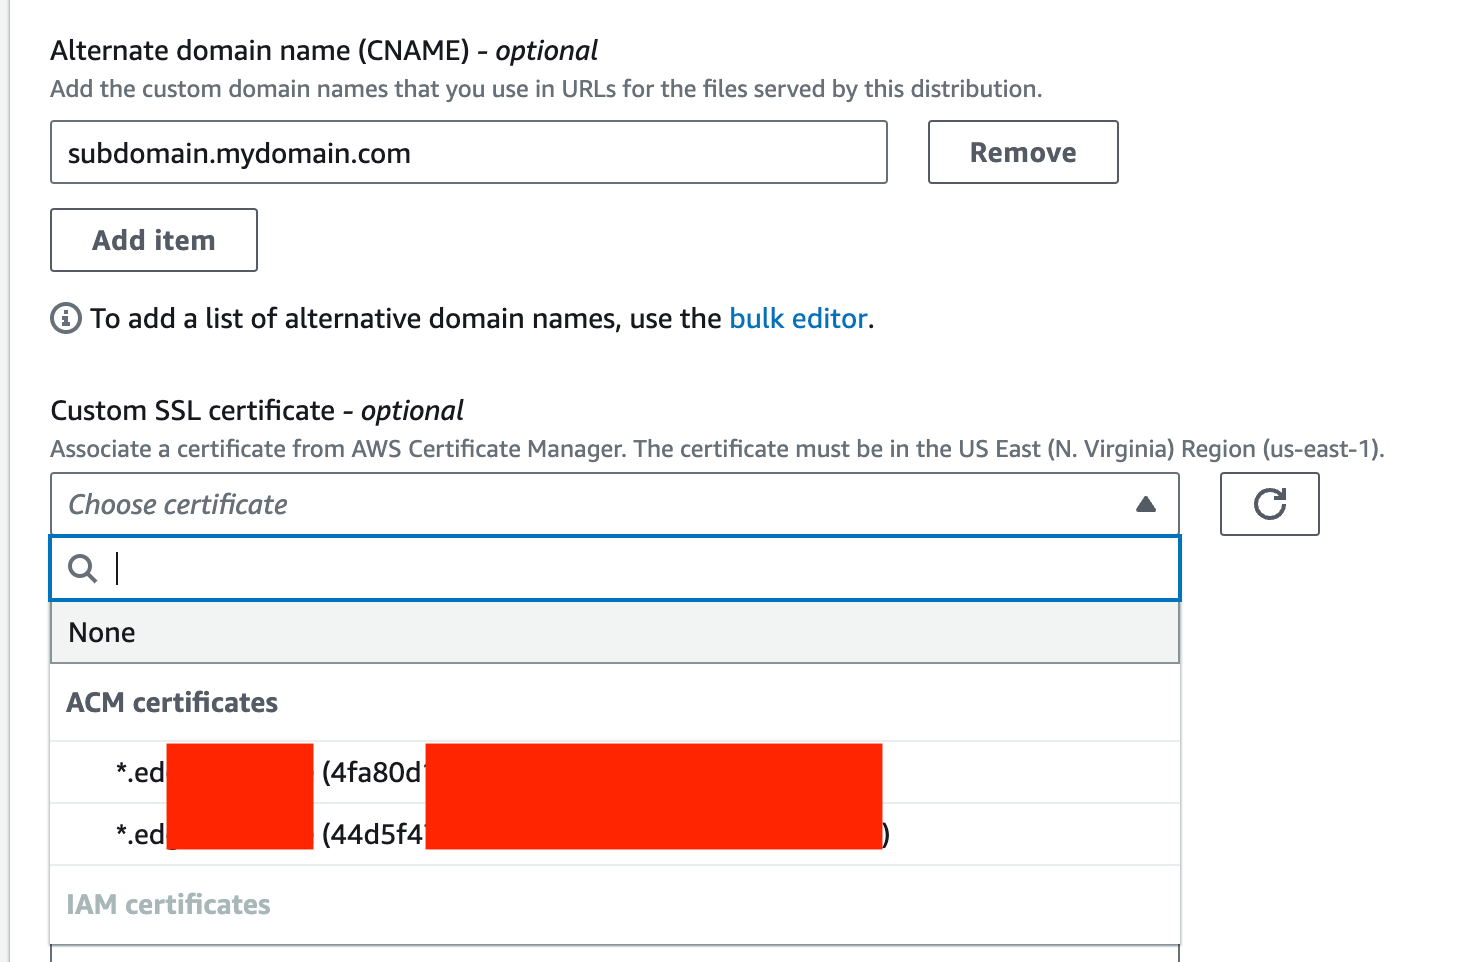
 3. Edit the `Alternate domain name` for your domain. In the format: `subdomain.mydomain.com`.\
Then select the `Custom SSL certificate` created in [Step One - Request a public certificate](#step-one---request-a-public-certificate) from the list.
3. Edit the `Alternate domain name` for your domain. In the format: `subdomain.mydomain.com`.\
Then select the `Custom SSL certificate` created in [Step One - Request a public certificate](#step-one---request-a-public-certificate) from the list.
 4. You must select `Cache policy` and complete the rest of the configuration as needed.
5. Click on `Create distribution` and wait for a few minutes for the changes to apply.
By now, you should have a CloudFront distribution ready.
4. You must select `Cache policy` and complete the rest of the configuration as needed.
5. Click on `Create distribution` and wait for a few minutes for the changes to apply.
By now, you should have a CloudFront distribution ready.
 ### Step Three - Configure DNS
Create a CNAME record in your DNS service (such as Route53) that will match the *Alternate domain name* in the CloudFront distribution created in [Step Two - Create CloudFront distribution](#step-two---create-cloudfront-distribution):
Use values that match your CloudFront distribution. For example:
* Type: CNAME
* Name: `your-subdomain`
* Data: `your-distribution.cloudfront.net`
### Step Four - Configure firewall rules to restrict access via CloudFront
* To prevent direct access to the workload endpoint, configure the firewall settings for the workload to allow ingress for CloudFront [list of IP ranges](https://d7uri8nf7uskq.cloudfront.net/tools/list-cloudfront-ips). You can refer to [this example workload YAML file](https://cpln-public-bucket.s3.amazonaws.com/nginx3-workload-cloudfront-example.yaml) and copy the CIDR range directly from this manifest.
* **BYOK Only**: If you have created inbound rules on the Security Group of the Load Balancers, either directly or using the Actuator configuration [INGRESS\_FIREWALL\_CIDR\_LIST](/byok/settings/actuator), you will need to update the Security Group configuration with CloudFront CIDR ranges to enable CloudFront access to the workloads. **Important**: To support this setting, ensure that your quota for `Inbound or outbound rules per security group` under `Amazon Virtual Private Cloud (Amazon VPC)` values for at least **530** rules. Visit [Service Quotas](https://console.aws.amazon.com/servicequotas/home/dashboard) in the AWS console for your region to request a quota increase if necessary.
### Step Three - Configure DNS
Create a CNAME record in your DNS service (such as Route53) that will match the *Alternate domain name* in the CloudFront distribution created in [Step Two - Create CloudFront distribution](#step-two---create-cloudfront-distribution):
Use values that match your CloudFront distribution. For example:
* Type: CNAME
* Name: `your-subdomain`
* Data: `your-distribution.cloudfront.net`
### Step Four - Configure firewall rules to restrict access via CloudFront
* To prevent direct access to the workload endpoint, configure the firewall settings for the workload to allow ingress for CloudFront [list of IP ranges](https://d7uri8nf7uskq.cloudfront.net/tools/list-cloudfront-ips). You can refer to [this example workload YAML file](https://cpln-public-bucket.s3.amazonaws.com/nginx3-workload-cloudfront-example.yaml) and copy the CIDR range directly from this manifest.
* **BYOK Only**: If you have created inbound rules on the Security Group of the Load Balancers, either directly or using the Actuator configuration [INGRESS\_FIREWALL\_CIDR\_LIST](/byok/settings/actuator), you will need to update the Security Group configuration with CloudFront CIDR ranges to enable CloudFront access to the workloads. **Important**: To support this setting, ensure that your quota for `Inbound or outbound rules per security group` under `Amazon Virtual Private Cloud (Amazon VPC)` values for at least **530** rules. Visit [Service Quotas](https://console.aws.amazon.com/servicequotas/home/dashboard) in the AWS console for your region to request a quota increase if necessary.